
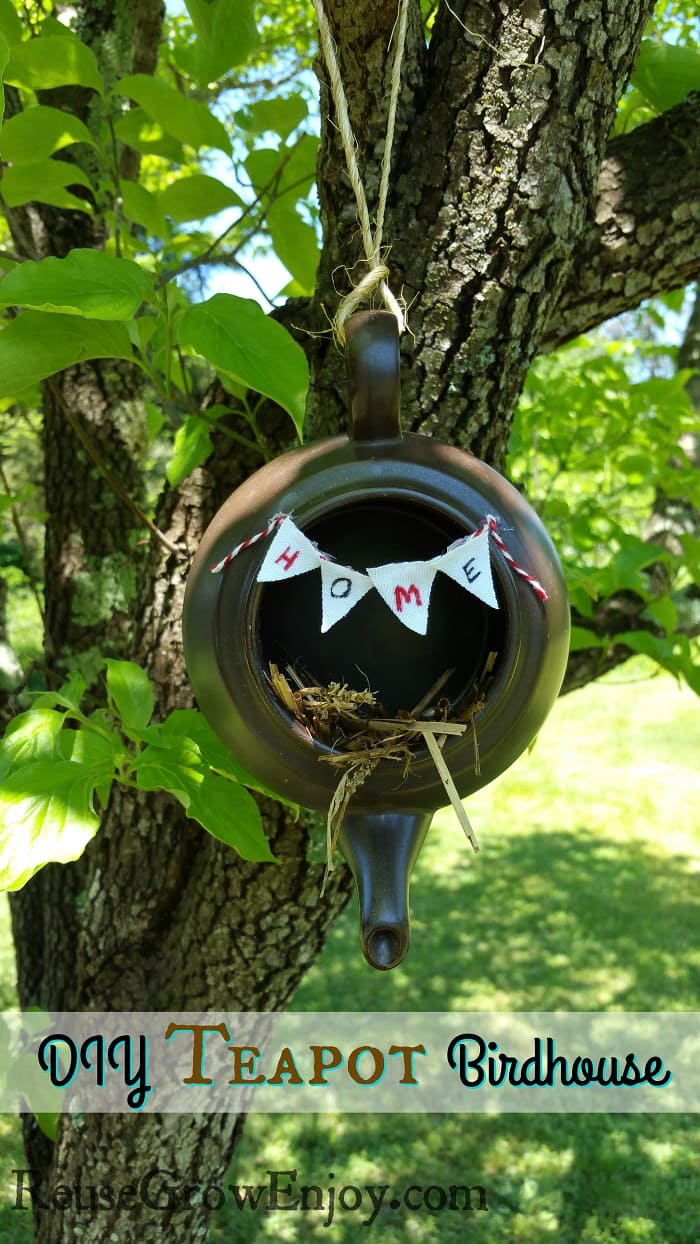
Do you have any teapots laying around that you no longer use? If so, you may want to check out this DIY teapot birdhouse.
DIY Teapot Birdhouse
Even if you do not have any teapots on hand to make this teapot birdhouse, I don’t know about you, but I always see tons of them at thrift stores and yard sales for super cheap.
This birdhouse is very easy to make and is super cheap as it requires very little supplies, and you can pretty much just use what you have on hand and get creative with yours. You do not have to be the same as the one I made.
If you are looking for other birdhouses and feeders to make, here are a few to check out.
- Beehive DIY Birdhouse From Upcycled Container
- Upcycled Mayo Jar Into DIY Bee Feeder
- DIY Hummingbird Feeder (From Upcycled Items)
- Upcycled DIY Plate and Bowl Bird Feeder
- DIY Bird Feeder
First off, here are the supplies you will need to make this DIY teapot birdhouse.
Supplies:
- 1 Teapot with removable lid
- 1 Small piece of string (about 4 inches long)
- Permanent Markers
- Small piece of fabric
- Hot Glue Gun
- 1 Hot Glue Stick
- Handful of straw or grass
- 1 Piece of twine or string (about 12 inches long)
- Scissors
How To Make This DIY Birdhouse:
Take the fabric and cut out four small triangles. Small, but yet large enough that you can write one letter on.
Then take the marker and write letters to spell home on each of the four triangles. After that, you will hot glue those to the center of the 4-inch piece of string (I used craft/baker’s twine).
Now remove the lid from the top of the teapot. Then you can glue the string banner you just made draped over the hole to the top of the teapot birdhouse.
It is up to you, it can be centered like I did or you can place it more to the side if you want.
Now that you have it decorated, you can put the string in place to hang it.
Simply knot the two ends of the 12-inch string together. Then place it through the handle and run it back through itself so that it stays attached to the handle.
Then you can choose where you want to hang it and loop the string over a branch. Add a small handful of straw or grass in the pot after you have hung the teapot birdhouse.
Frequently Asked Questions For Teapot Birdhouse:
Q. Do you have to put a banner on the birdhouse?
A. No! If you like just the look of the teapot you have, feel free to hang it up as is.
Q. Should you block the hole of the spout so baby birds do not fall in and get stuck?
A. You can if you would like. Just be sure that if you do cover/plug it, you make sure you have some small drain holes in it. Birds make lots of liquid messes and it needs to be able to drain.
Note: this is not normally a step that is needed as birds will make their own nest inside the teapot that is safe for their babies. However, if you are worried about it, you can close it off as noted above.
Marcella says
Love your idea for the old teapot.
Reuse Grow Enjoy says
Happy to hear you love it Marcella!
Anonymous says
Great Idea Im going to fix up one for my yard as well thanks
MGA says
Should you not block the spout in case a chick slips in and gets trapped?
Reuse Grow Enjoy says
If you are worried about that you could slightly block it off if you would like. Just be sure that if you do that you still allow a few small drain holes as it needs to be able to drain.
Laura says
How about gluing a small piece of netting inside the teapot so a baby bird doesn’t slip in and liquid can still drain out.
Also how about gluing a piece of fabric/burlap on both sides of the handle so birds can stand without slipping?
Just a thought.